
DLP not blocking SSN number in emails
Scenario
Blocking emails containing a Social Security number (SSN) in DLP Microsoft 365 can be difficult, if not impossible. This is especially true when the SSN is found embedded in a link, such as an email advertisement. In this article, we will show you how to block email containing SSN using Microsoft 365 DLP.
How do I block email containing a social security number (SSN)?
There are a few ways to block email containing SSN. One way is to use the mail flow rules capabilities of DLP Microsoft 365. You can use these rules to block incoming messages that contain specific words or phrases that might identify the individual who submitted the message. For instance, if you are a bank and you want to prevent users from sending unsolicited loans to others, you could create a rule that blocks all messages that include the word “loan.” Additionally, you could also use content filtering technology on your email client to automatically block emails containing SSN.
Steps
As of this writing, it would require a pair of SSN and Keyword for DLP (Data Loss Prevention) policies to work. In this article, we will create a mailfow rule and use a pattern to work around it.
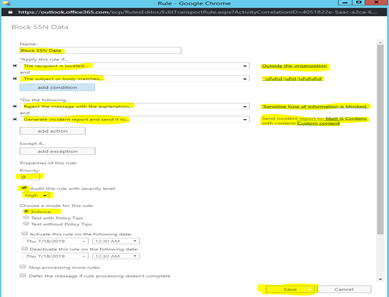
How to automatically reject/block sensitive data patterns (SSN)
-
Go to Office 365 Admin Center then choose Admin Centers
-
Select Exchange and in the Exchange Admin Center go to mail flow
-
Under rules click on + to add a rule (create a new rule)
-
You can name the rule any name you want (sample Block SSN Data)
-
In *Apply this rule if – select The recipient is located… then select Outside the organization
-
Click add condition – select The subject or body matches… then enter this pattern (US-SSN pattern)
\d\d\d-\d\d-\d\d\d\d -
Under *Do the follow.. – if you’d like to block this message select Reject the message with the explanation – then you can type in any reason you want to be disclosed.
-
Optional – if you’d like the admin to be informed of the incident you can select – Generate incident report and send it to… – set the recipient who will receive the report and manage the content you can select all.
-
Set priority to 0
-
Set Audit this rule with severity level: High
-
Choose Enforce for the mode of this rule.
-
Then Save