Unable to create profile in Outlook
Scenario
Having trouble creating a profile in Outlook? Don’t worry, you’re not alone. It’s a common issue, and thankfully, there are several troubleshooting methods at your disposal. In this guide, we’ll discuss eleven of the most effective and useful techniques to resolve this issue and get you up and running with Outlook in no time.
Steps
Method 1: Make sure the credential is correct
- Log in to portal.office.com to make sure that the email address and password are correct
- If User is able to log-in, Go to Admin > EAC > Recipient > Mailboxes > User Mailbox > Email Address> Check the SMTP address
- After that, if the SMTP address is different to the log-in credentials therefore, ask the end-user to make both them the same.
- Re-try setting up account
- Try setting up the account on the SMTP address and not the log-in credentials
Method 2: Check AutoDiscover Record
If you are unable to create a profile in Outlook, one of the basic things to look at is your machine if it is able to see your broadcasted AutoDiscover records.
- Go to https://testconnectivity.microsoft.com/tests/O365Ola/input
- Or any third party checker (e.g. MXTOOLBOX) then check the AutoDiscover seen.
- Open CMD
- type
nslookup autodiscover.domain.com - You should be able to see
- autodiscover.outlook.com
- autodiscover.domain.com
- type
- If you were able to see autodiscover using nslookup autodiscover.domain.com
- Run CMD
- type
ping autodiscover.domain.com - You should have the same result with nslookup
- type
- Use MSFT’s SARA tool
Method 3: Use SARA Tool
SARA tool is created by Microsoft. In addition, it will help you isolate the issue of being unable to create profile in Outlook.
Subsequently, It will check if..
- the Office suite has a missing patch
- any registry items that to be deleted (ExcludeHttpsAutoDiscoverDomain)
Method 4: Bypass DNS & Turning off Firewall and Anti-Virus
- Open Network and Sharing Center
- Click on “Change Adapter Settings”
- Double-click on the network the user is connected to
- Click on Properties
- Uncheck the IPv6
- Double-click on the IPv4
- On the DNs server address add the 8.8.8.8
- Then on Alternate DNs server address add the 8.8.4.4
- Click SAVE
- Turn-off PC’s Firewall and Anti-Virus
- Then, try again to set up the account
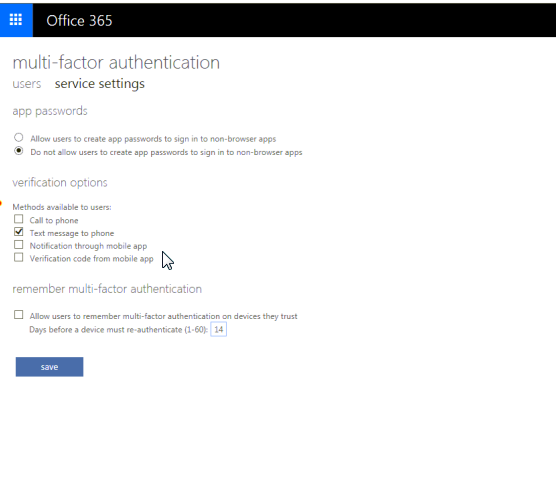
Method 5: Multi-factor Authentication
Moreover, If user is using a multi-factor Authentication therefore, you need to create an app password (retired) to set up the account.
To check:
- Log in to portal.office.com
- If user is setup with multi -factor authentication, either ask the client to turn off the Multi factor authentication. Otherwise, proceed on creating the app password
Create an App Password (retired)
- Go to the Office 365 portal
- On the upper right gear icon (settings)
- Click Office365
- Then on Security & Privacy
- Create an app password
- Additional security
Method 6: Local AutoDiscover is Cached
Outlook has an event we called “AutoDiscover Journey” before it can setup an account.
As a result, the local AutoDiscover setup might be the problem even though the AutoDiscover is properly set up on your DNS host. This method is one of the advance ways of isolating issue related to being unable to create profile in Outlook.
For instance, see this post to understand better.
1. Go to this directory location %userprofile%> AppData > Local > Microsoft > Outlook
If no AppData found, change the Windows OS settings to view hidden files
2. Rename the whole Outlook Folder (OutlookOLD)
Firstly, ask the end-user first if they have contacts and calendars on the account. Furthermore, if account is on IMAP set up, a data loss maybe involved in the process.
After that, or once confirmed, refrain from doing this. Otherwise, you can proceed. Importantly, IMAP stores locally the calendar and contacts data however it do not sync it back to the servers.
3. Try to set up again Outlook
Method 7: A profile is corrupted and affecting the new profiles
Delete profiles
Firstly, ask the end-user if it’s okay to delete the profiles specially if they have other POP or IMAP accounts coupled in a single profiles.
1. Go to Control Panel
2. Look for Mail
3. Click on Show Profile
4. Delete all profile
5. Create a new Profile
6. Try to Open Outlook
Delete registry
If the issue is persistent, remove the profile on the registry.
1. Open RUN
2. On the Registry, look for this
For Windows 8, 8.1,10 (15.0) means the version of Outlook. For M365 apps it is (16.0)
HKEY_CURRENT_USER> Software> Microsoft> Office> 15.0> Outlook> Profiles
For Windows 7
HKEY_CURRENT_USER > Software > Microsoft\Windows NT > CurrentVersion > Windows > Messaging Subsystem\Profiles
3. Right click on the folder with your profile name then click Delete. Moreover, when prompted
4. Click on Yes.
5. Close everything out then restart your computer.
6. Create a new profile on the Control Panel
Method 8: (For Outlook 2013 only) Manually add the server settings
- Add an account however choose the Manual Settings not the Automatic
- Then add this server settings
outlook.office365.com - Follow the next step of the wizards until finish
Method 9: Manually add the server settings using the Exchange ActiveSync (for Outlook 2010 and 2013 only)
- Select Manual setup or additional server types, then click Next
- Then select Microsoft Exchange Server or compatible service,
- After that, click Next.
- Enter the following in the following fields:
- Server: outlook.office365.com
- User Name: User’s Username
- When finished, click More Settings…
Importantly, do not click the Check Name button at this step otherwise the configuration process will fail.
- Click the Security tab.
- Then adjust the following settings:
- Uncheck Encrypt data between Microsoft Outlook and Microsoft Exchange.
- Choose Anonymous Authentication from the Logon network security drop- down menu.
- In the Connection tab, check Connect to Microsoft Exchange using HTTP, then click Exchange Proxy Settings…
- On Use this URL to connect to my proxy server for Exchange field, then enter outlook.office365.com.
- Check the Only connect to proxy servers that have this principal name on their certificate, then enter msstd:outlook.com in the associated text field.
- Adjust the following settings:
- Check the On fast networks, connect using HTTP first then connect using TCP/IP box.
- Select Basic Authentication from the Use this authentication when connecting to my proxy server for Exchange drop-down menu.
- Click the OK.
- Then OK.
- Click Check Name.
- An authentication prompt will appear. After that, enter your email address and password in the corresponding fields, then click OK.
- Click Next
- Then click Finish.
Method 10: Manually set up the AutoDiscover on the Local Machine by using registry
-
Search “RegEdit” in the search bar.
-
Try to add this value first then restart the machine
HKEY_CURRENT_USER\Software\Microsoft\Exchange “MapiHttpDisabled”=dword: 1 -
If the above modification doesn’t work, follow below then restart the machine
HKEY_CURRENT_USER\Software\Microsoft\Office\xx.x\Outlook\AutoDiscover

ExcludeHttpsRootDomain
ExcludeHttpsAutoDiscoverDomain
ExcludeScpLookup
ExcludeSrvRecord
ExcludeSrvLookup
ExcludeLastKnownGoodURL
Add each of the keys below as DWORD 32 bit then change its value to 1 by right clicking it then edit.
ExcludeHttpRedirect
PreferLocalXML
ExcludeExplicitO365Endpoint
Change its value to 0 by right clicking it then edit
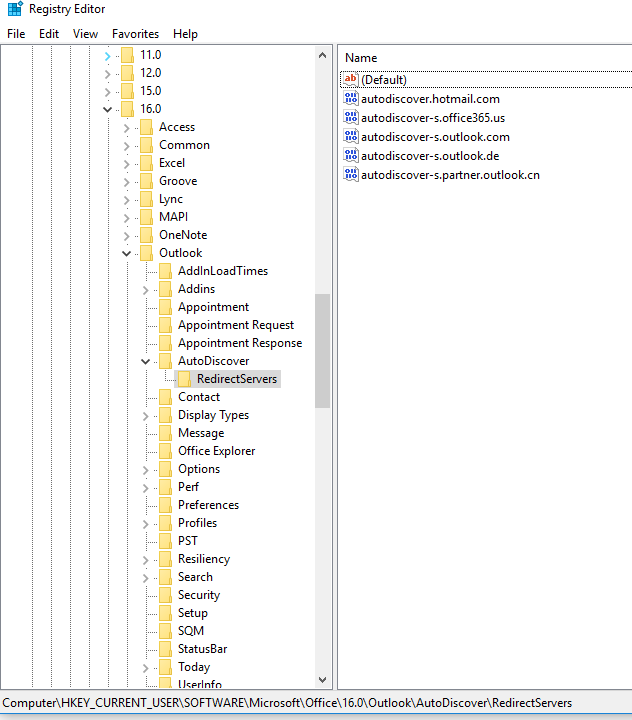
Method 11: Delete AutoDiscover extra RedirectServers entry
Lastly, in a very rare scenario the issue can reside on excessive AutoDiscover entries from this folder. Therefore, one of the best place to look at the issue.